
If you’re like 40% of the world, your website is probably built on WordPress. WordPress already has an edge when it comes to being found on Google better and creating a structure that Google loves, but can you step that up a bit from the norm?
Of course you can!
Every single website I build comes with Yoast, a free and premium plugin that helps you take your SEO to the next level. Let’s look at a few configurations available with the free plugin that you can do to get found on Google better.
Add Meta Titles & Descriptions to Your Main Pages and Posts
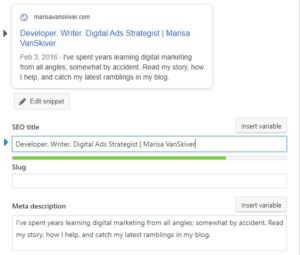
Probably my favorite feature of Yoast is the ability to easily add Meta Titles and Descriptions to all of your main pages and blog posts. Why is that important? For one, Google looks at the meta title for your page and the description to understand what that page is about. But most importantly, those are what are shown in search results and can entice a browser to click (or not). You want to include about 60 characters in your title and only 160 in your description, but you always want to have some kind of call to action in your description.
Here’s how the Yoast side of that box looks:
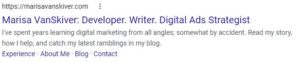
And what that comes out looking like on Google:
With both your meta titles and descriptions, you want to find a way to include that page’s target keyword or key phrase in them. Partially this is to catch your searchers’ eye and let them know you have the answer to their problems, but of course that’s a benefit to Google as well.
I highly recommend installing Yoast today and work through adding custom meta titles and descriptions to your content now. It can do a lot to improve your click-throughs from Google to your website. Start with your main pages and biggest blog posts first, then work your way down. If you want to delve in further, I highly recommend Moz’s rundown of meta tags.
Easily Add Your Organization Schema
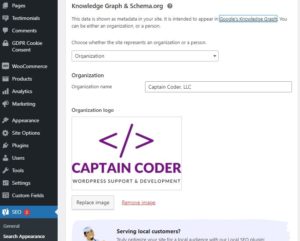
You know when you search a business, person, or even a movie and Google shows you nicely organized information up front? They’re pulling from your Schema.org knowledge graph. Yoast makes adding to this and updating your information pretty easy with their own built-in Knowledge Graph settings. All you have to do is go to the Yoast SEO tab in the left-hand menu of your WordPress backend and go to Search Appearance. Just select the correct information for you and add your relevant details and save. Done! Easy-peezy lemon squeezy.
Choose What Google Indexes
Telling Google what to NOT index is almost as important as what you want Google to display in their search results. This can get just a little technical, but there may be a few pages in your website that you don’t want displayed (I hide my Thank You pages, for instance), maybe you’re not writing blogs so you don’t want Posts shown in Google, and you probably want Google to just index the images on your website, not the special Attachment pages that WordPress creates. (There are pages that basically display just an image in your Media Library, but as a page on your website. It usually doesn’t look great.)
Hiding a Single Page or Post
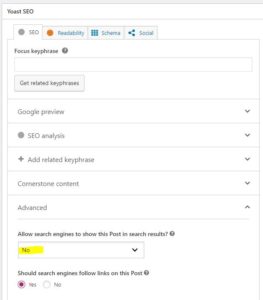
First, if you don’t want a specific page to be found on Google – like if you have download pages for Lead Capture opt-ins or Thank You pages when someone contacts you – then you can tell Google to ignore it. Simple go to the Yoast SEO box at the bottom of that page, open the Advanced tab, and where it says Allow Search Engines to show this Page in Search Results you select No. You can still leave the Follow Links as Yes unless you want the page to become a dead-end if it’s found by Google.
Hiding an Entire Post Type
If you don’t want certain Post types to be indexed by Google altogether, you can actually hide all of them! I do this mostly for websites that I build that are not using their blogs – generic Posts – altogether. We don’t want Google to try and list something that doesn’t really exist, after all.
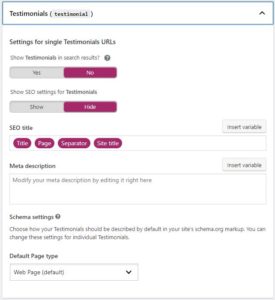
I also do this when I have a Custom Post Type that won’t have its own page, for instance, Testimonials.
To hide an entire type of posts, you’ll go to Yoast SEO in the left-hand menu again > Search Appearance > Content Types. Under that, you can choose whether or not you want Google to be able to list certain types of posts in your website.
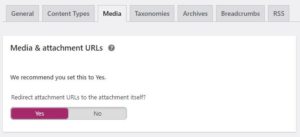
Hide Media Attachment Pages
As I mentioned above, for some reason WordPress’s default setting is to create actual pages for any images or files you upload through the Media Library. That tends to be messy and we don’t actually want people to land on those weird pages, so Yoast lets us turn those off altogether through a redirect to the actual image file instead. Again, go to your Yoast SEO in the left-hand menu > Search Appearance > Media and set that to Yes. (Pro tip: make sure your images are optimized for SEO, too!)
Now, Easily Tell Google
Here’s the absolute best part of Yoast. After you do all this work to boost your website’s SEO, they make it super easy to tell Google you’ve made changes by creating what’s called an XML sitemap. That sitemap will automatically be created for you at yourwebsite.com/sitemap_index.xml.
This gives Google a really quick rundown of all your pages, posts, and images and they love receiving that in the format of an XML sitemap because their robots can crawl it all super easily.
Come back next week, because I’m going to tell you exactly how to take this XML sitemap and submit it to Google to get your new (or updated) website indexed in hours instead of the weeks it might take otherwise!