As a marketing professional, writing blog after blog can feel, well, overwhelming. What’s worse is writing a blog or an article and feeling like it’ll never be seen, even though that’s all we want. How do you ensure that what you write is found by search engines? You have to follow some search engine basics.
Look, as much fun as it is to write and create content, there’s a process to ensuring that what we write gets found. Plus, getting the traffic is only half the battle. What we write not only has to be found, but it has to help us convert.
If you feel like you’ve been creating great content that doesn’t show up in Google results, or you’re getting traffic but there’s no engagement, you have an issue.
The good news? You can make some simple tweaks to how you’re structuring your articles to improve both getting found and making an impact.
Stop screaming into the void. Let’s walk through 7 essential things you need to do every time you publish to your website.
Table of Contents
Search Engine Basics Matter
Before we get started, I know you might be wondering, “But Marisa, in an AI world, does SEO matter?”
First off, absolutely. Thousands of people search for terms like, “how to remove AI from Google search.” But more than that, most AI (well, LLM) tools are looking for your website much like Google does. Since these are both machine-driven search tools, they’re looking for some of the same things to find and index your website.
Beyond your traditional search engine optimization, those same best practices align with AI discoverability (or AEO) and web accessibility. SEMRush recently found that websites that followed web accessibility guidelines saw a 23% increase in traffic, even amid changes to traditional search.
I started building websites in 2001 and web accessibility in 2013. The basic HTML best practices I learned as a 13-year-old coder overlapped with the SEO principles I had been learning since 2010, which overlapped with the web accessibility guidelines I learned in 2013. And very little of those have changed since then.
If you follow these 7 steps, you’ll have a strong foundation to get discovered on multiple platforms and convert anyone in your target audience.
1. Use Headings Correctly
If you’re using WordPress or another similar WYSIWYG tool for your website, you’re probably selecting a heading size in your blog articles. Did you know that the size you select isn’t a design thing, but actually a very important factor in SEO and web accessibility?
Writing good content for the internet audience means making it skimmable. Headings help people navigate your content and find the section that matters most to them. This absolutely applies to blogs and articles, too. But these headings also help Google and other search and answer engines to understand the context of your content.
One of the biggest mistakes I see people make is using multiple H1s or skipping the H2 or having an H3 before the H2, because they think it “looks nice.” How do you use headings correctly? You use them in order. If you can remember back to college when you had to write term papers, it’s a similar concept.
How to Order Your Headings
Your article should have one H1. This is the title of the article and sets expectations for what they will find in it. Then, as you continue writing, you’ll want to break your article into subpoints. Each subpoint should be introduced with an H2. If you have subpoints within that section, they are introduced by an H3 and can go down to an H6.
The H1 should be the largest font size on the page, followed by the H2, then H3, then H4, etc. This visual hierarchy signals to readers what’s most important first and helps them better understand the article’s context.
The same applies to search and AI bots crawling your website. That tag, H1, H2, or H3, etc., signals to them the context and importance of each heading in your article. Both of these tools also really love it when a keyword you’re targeting is in that heading, because your readers are actively searching for that, too.
(This article and every single one I write is full of the exact thing I’m talking about, if you’d like to view the source and check it out.)
If you’re a visual learner, this infographic shows how we use accessible, SEO-friendly headings.
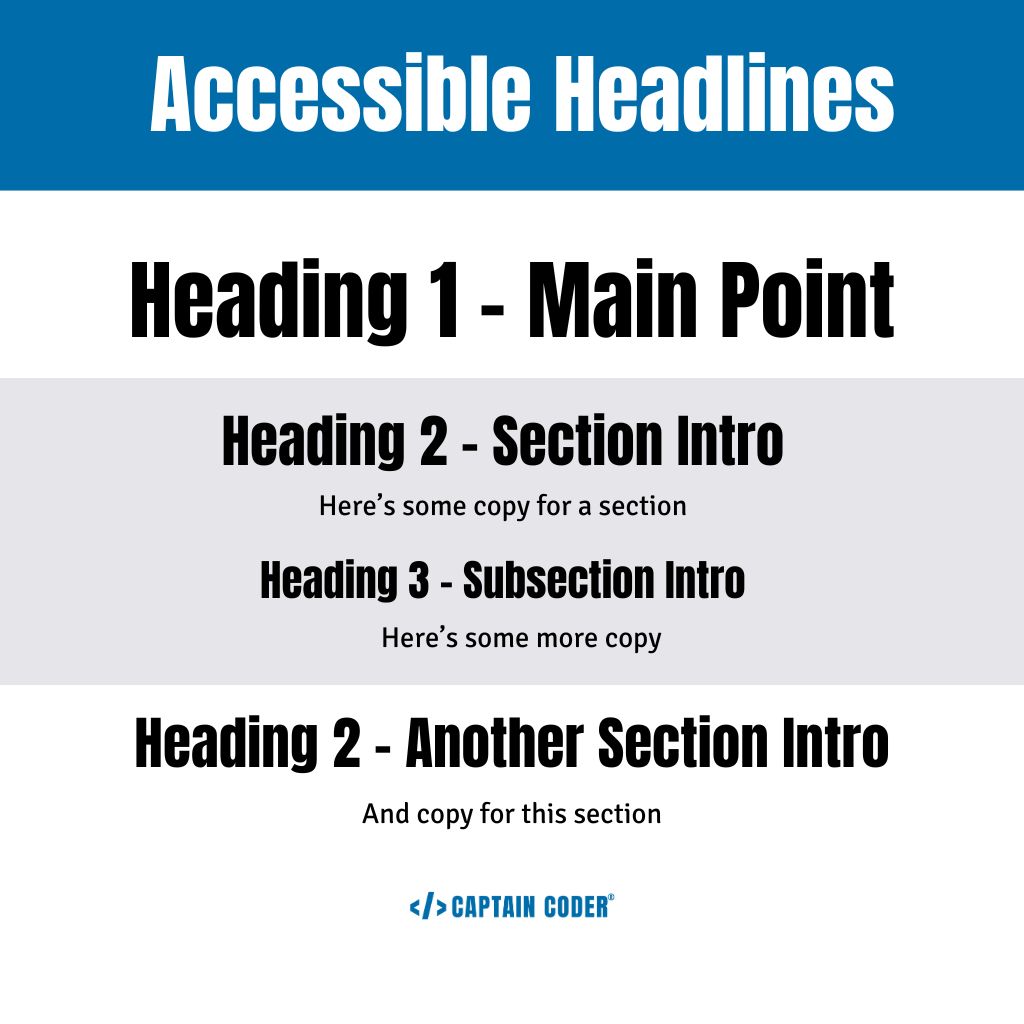
Infographic text:
Accessible Headlines
Heading 1 – Main point
Heading 2 – Section Intro
Here’s some copy for a section
Heading 3 – Subsection intro
Here’s some more copy
Heading 2- Another section intro
And copy for this section.
2. Check Content Reading Level
I want to break something to you – very few of your readers will read every word of your articles. Most come to a blog from a search results page looking for a quick answer to their problem or guidance on how to address it. Want to make your content easy to read and skim quickly? We have to write accessible content.
Complex text acts as a barrier, and not just to people with dyslexia or other reading difficulties. When you write a blog article, make sure that you’re writing to a lower-secondary level.
What does that mean? It includes stripping out technical jargon, using shorter sentences, and simpler sentence structure. You can also improve your content by using more of your customers’ lingo, bullets, short sentences, and bold important passages to make it all easy to skim.
Not quite sure if you’re hitting that mark? I love the Hemingway app. It’s a free tool that analyzes your writing and not only rates your reading level but also highlights the most difficult passages. You can pay for the pro version to get help on improving your content, too.
When your content is easy to read and understand, you’re going to make it much easier for your readers to convert. Using their language means you’re matching their Google searches, too. In short, it’s just a win-win-win for everyone.
3. Link Relevant Pages
Blog articles are great for our SEO because they can answer a specific question or address a search keyword. But are you stopping those readers from moving to other pages on your website that they may be interested in? You are if you’re not linking anything.
Any SEO consultant will tell you how important it is to add internal links throughout your website. The same concept applies to blogs, maybe even more so. If you want to keep those searchers-turned-readers on your website for longer, you need to invite them to explore other pages by linking to them.
Throughout your articles, if you reference a topic you’ve written a blog about? Link to it. If you talk about a service or product you provide? Link to that page.
Using Clear Link Text
One thing I want to note? It’s important to link to these relevant pages and articles, but we also need to link to the correct text.
What do I mean? For instance, if I talk about web accessibility remediation, I can make “web accessibility remediation” a link back to that service page. The text I link to is incredibly important because it signals exactly what I’ll find when I click it.
This matters not only to people reading your website but also to search engines. Google and other bots are looking for this linked text (technically called anchor text) to understand what type of content they’ll get if they follow that link. If you link basic text like “click here” or “learn more,” it tells both your readers and your bots nothing about what they’ll find.
Accessibility Note: Linking relevant anchor text is crucial for people using assistive technology such as screen readers. Often, these individuals are navigating through the keyboard, which jumps from link to link. The screen reader will read the link text back to them. So if all a visually-impaired person hears is “Link: click here,” “Link: learn more,” they have no idea where they’ll go when they click that link.
4. Add a Meta Title and Description
Want to control what Google shows on its search results pages? You need to add a meta title and description.
Fun fact: these can sometimes be rewritten by Google if they believe other parts of your article might be more important to that searcher. However, the title and description are the first indication people get about what they’re going to read. It’s quite literally the make-or-break reason for someone to click on your page versus another search result.
They also give Google and AI tools a short summary to pull from, so they understand what your article is about.
Meta Titles Best Practices
Every article you write should have a unique, descriptive title that matches the article’s intent. This title needs to be 60 characters or fewer so it gets displayed properly in search results. And, when possible, you want to include relevant keywords so the person searching can spot what they asked.
Answering a specific question with your article? Phrase your title as a question. That can help AI tools better understand that you’re providing that answer with the article.
I always recommend that you add your organization’s name at the end of your meta title, as well. That helps people clearly know whose website they’re about to visit. Add a separator such as a | or a -.
Example: this article’s meta title is “7 Essential SEO Steps for Every Post | Captain Coder”
Meta Description Best Practices
The description is a short summary of your article. For this, you have 150-160 characters to tell people what you’ll talk about and why they should click on that search result. Same with titles: every article you write needs a unique description that matches the content.
For searchers, I like adding a clear call to action in the description. Give a brief overview of the article, then add an action verb like “Discover,” “Learn,” or “Read” to direct them to click your link.
For AI tools, you want to ensure the description answers a likely question. Since this is probably what people are looking for, it can help real humans as well.
Example: this article’s meta description is “Looking to get people to discover and read your content? Learn the 7 essential things you need to do every time you publish an article to your website.”
5. Set a Descriptive URL
Another key signal to Google and bots what your page is about? The URL. How we structure our URLs matters a lot to the discoverability of our articles and other content. While Google and AI bots can crawl the links throughout your website, we want to make it as easy as possible for them to know what that page is about. Keeping it simple matters here.
If you’re writing blog articles, you may have the /category/ preface in your URLs, i.e. /visit-events/student-recap-article. That’s perfectly fine, though I personally don’t organize my own content that way. As long as you keep those URLs short and to the point, it helps crawlers get through your website faster.
URL Best Practices
A key part of this? We need to ensure we’re separating individual words in the URL. If you had an article about the 2026 commencement ceremony, you would not want the URL to be /2026commencementrecap.
Why? Because Google can’t tell where one word ends and another begins when it’s all smushed together. We also don’t want to use underscores to separate words. Most search engines treat underscores ( _ ) as part of the word, not a separator.
Instead, each word should be separated by a dash. So our commencement example would become /2026-commencement-recap.
Accessibility Note: Screen readers read the URL of a page as it loads. Without the dashes, it also cannot separate which words are which as it reads, so proper URL structure is important for accessibility compliance, too.
6. Optimize Your Images
You want your article to be visually appealing, not just a wall of text. How do you break it up? With some images! While adding these images can be great for reinforcing your points, adding examples, and improving user flow, not optimizing them correctly can take away any SEO benefit.
One of the most common mistakes I see marketing teams make when they add blogs is not following the correct process for adding these images. Before you upload another blog article, let’s talk about the 3 things we want to do to optimize your images.
Resize Images
Is this a bit technical? Sure. But if you’re adding a full-size 5000 pixel-wide image to your blog posts, you’re taking up a lot of storage and time to load those images. Especially if you’re adding several to the website.
Instead, you want to resize these to fit your page. Depending on how you use images in your website, I typically recommend making them no larger than 2000 pixels wide. There are image optimization tools you can use to help compress file sizes so they load faster.
Use a Descriptive File Name
After you’ve resized your images and before you upload them to your website, you want to rename them something descriptive. Much like with your URLs, we want to separate words with dashes, too. These file names are the first things Google Image search and other tools will look at to understand what’s in the image.
So, instead of uploading that image with the filename 01356.jpb, you’re going to rename it to something descriptive like red-ford-truck.jpg.
Add ALT Tag Descriptions
After you’ve named the image, you can upload it to your website. But you’ll want to provide a clearer, more concise description of the image for screen reader users. We do this through ALT tags, or the Alternative Text description.
An ALT tag should be a literal description of the image to provide context to readers using screen-assistive technology. This also helps Google understand what’s in the image so it can give you some SEO value, too.
While you can use some of your SEO keywords in ALT tags, only do that if it makes sense. These are specifically for individuals who are blind or visually impaired first. The context matters.
Not sure where to start? I’ve got a great overview of writing ALT tags on my YouTube channel.
7. Check Color Contrasts
When you’re writing blog articles, there’s a high likelihood that you’re going to use some design elements to help it stand out. If you’re adding infographics, charts, or even just experimenting with unique looks, you need to check the color contrast first.
A low-contrast font color on a background color means that someone with low vision or color blindness might not be able to read it. Think pink text on a red background. Sounds difficult to read, right? Those kinds of color combinations cause problems all the time.
We want everyone to be able to read our content, right? While you’re working on an article or creating graphics, make sure to run your colors through an accessibility tool. I personally love WebAim’s free contrast checker.
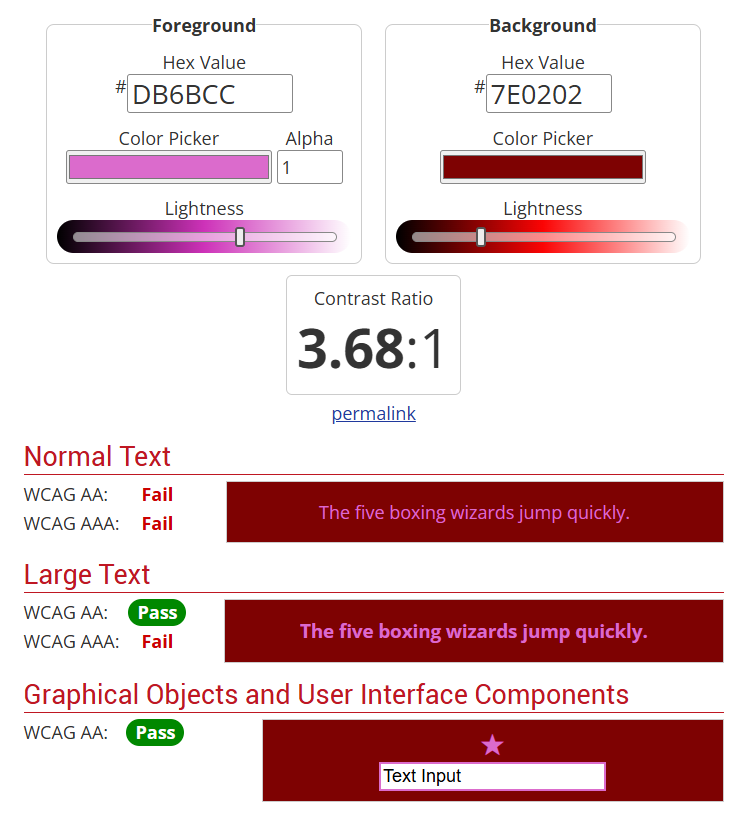
All you have to do is add the hexcode of the font and background colors you want to use. If it comes back as a fail, or even mostly a fail, that means not everyone will be able to read the text.
I personally test all of my brand color combinations and keep a chart on hand so I know what colors are safe to use with what.
How This Helps Your SEO
While Google can read through color contrast errors, people cannot. If you have contrast issues throughout your articles (and website), you’re preventing people from understanding your content. If they can’t understand it, they won’t read it, and they’ll never come back.
Poor user experience issues like this prevent your website from getting the engagement you want and signal to search engines that you, in fact, don’t have the answers.
Write Blogs People Can Find
There’s not much point writing blogs and articles if no one can ever find them. There’s even less point if no one is going to take any kind of action from those articles.
If you want to be found online and encourage conversions, we have to follow these 7 search engine basics. Not only will they help get people to your website, but they’ll help keep them there and reading.
Want to do more to help your conversions? Grab my free guide to the 5 UX Mistakes Killing Your Conversions.